
Amazon Music is one of the most popular music streaming services, offering a vast music library of songs, playlists, and podcasts. However, some users have complained that Amazon Music service is not as expected and even has some issues like not playing songs and not working on iPhone/Android.. Thus, many users don’t want to continue paying for the expensive subscription. Whether it's due to the subscription price, a preference for another platform, or just a change in taste, knowing how to cancel Amazon Music subscription properly is essential.
Since there are a lot of methods to get an Amazon Music subscription, the process of cancellation can be a little bit confusing, especially when you have lots of playlists or downloaded content. Don’t worry. This guide will walk you through the cancellation process and share important things to know before you cancel. What’s more, you can find the best way to save all your favorite Amazon Music songs offline even if your subscription ends.

Part 1. What to Know before Canceling Amazon Music
Before you go ahead and cancel your subscription, it’s important to understand what will happen after cancellation. Amazon Music provides three plans for different users: Amazon Music Free, Amazon Music Prime, and Amazon Music Unlimited. Both Prime and Unlimited subscription provides features like unlimited access to the Amazon Music library, ad-free listening, downloading music offline, and so on.
Once you cancel your Amazon Music subscription, you will lose access to all the advanced features, including all the downloaded songs on your device. That’s why it’s important to save your music in a more universal format if you plan on continuing to listen after cancellation.
To do so, there is only one thing you need to consider - the DRM protection of Amazon Music, which prevents you from playing downloaded music on other platforms. If you don’t want to lose your music, it’s vital to save your music in a normal audio format before canceling your subscription. After doing so, you can play all the downloaded tracks on other platforms and devices offline without limitations. That is TunesMake Amazon Music Converter. You can try it by clicking the Free Download button below or check more detailed information in Part 4.
Part 2. How to Cancel Amazon Music Subscription on Computer
Canceling your Amazon Music subscription is not a difficult process. You can do so through the Amazon Music app, website, or iTunes, depending on your initial subscription method. Below is a comprehensive tutorial, and you can follow it to end Amazon Music easily.
Note
If you signed up for Amazon Music through third-party services like Google or a mobile service provider, you need to contact them to cancel your subscription based on their policies.
Method 1. Cancel Amazon Music Subscription from Amazon Settings
For those who signed up for Amazon Music directly through their Amazon account, canceling your subscription is a breeze. By navigating to your subscriptions within your Amazon account, you can quickly and easily terminate your Amazon Music service.
1. Open any browser on your computer and visit your Amazon Music Settings page.
2. Alternatively, you can launch the Amazon Music app. Then, head to your profile and choose Settings > ACCOUNT > Manage Music Subscription.
3. Scroll down to find the Amazon Music Unlimited section and click the Cancel Subscription option.
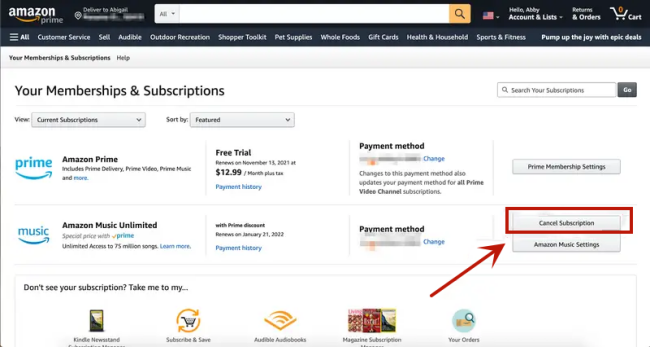
4. Confirm the cancellation by clicking Continue.
Now your Amazon Music Unlimited is canceled successfully. You can keep using your subscription until your current billing cycle ends. After that, the Amazon Music Unlimited songs and podcasts in your library will greyed out. If you don’t want to lose them, a great choice is to download Amazon Music songs to MP3 or other audio formats.
Method 2. Cancel Amazon Music via iTunes
When you have an iTunes app installed on your computer, canceling your Amazon Music subscription through iTunes is also available.
1. Launch iTunes on your Windows computer or the Music app on your Mac.
2. Move your cursor to the top toolbar and click Account > View My Account.
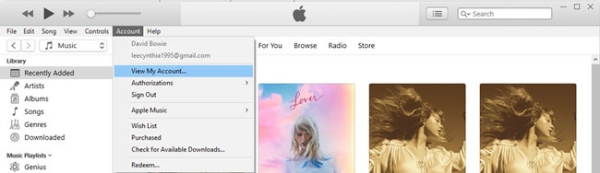
3. When it prompts a new page, you can scroll down to the Settings section at the bottom. Then, select Subscriptions > Manage.
4. Find your Amazon Music subscription and click Cancel Subscription.
Part 3. How Do You Cancel Amazon Music on Phone
Nowadays, most users are accustomed to enjoying Amazon Music on their mobile devices. Thus, the requirement to canceling subscriptions directly from their mobile device rises. Through the following ways, you can easily terminate your service without needing to access a computer, making it convenient and efficient.
Way 1. Cancel Amazon Music Subscription on Settings [iPhone]
Some users subscribed to Amazon Music through the iPhone’s App Store. If you are one of them, you can manage your subscription directly within your iPhone’s settings. It is the most straightforward method.
1. Open the Settings app on your iPhone.
2. Tap your name at the top.
3. Then, select Subscriptions.
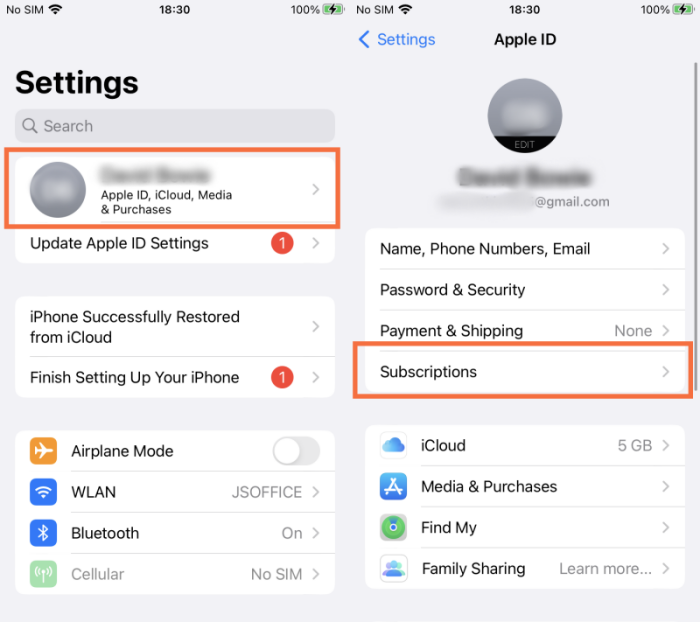
4. Here you can find your Amazon Music subscription and cancel it by tapping the Cancel Subscription button.
If you can not see a cancel button or you see an expiration message in red, then your Amazon Music subscription is already canceled.
Way 2. Cancel Amazon Music on the Official App
The Amazon Music app allows for direct subscription cancellation, enabling you to manage it entirely on your mobile device. This section will guide you through that process.
1. Open the Amazon Music app installed on your mobile phone.
2. In the Home screen, tap the gear icon at the top-left corner to enter the Settings section.
3. Then, select YOUR ACCOUNT > Amazon Music Unlimited.
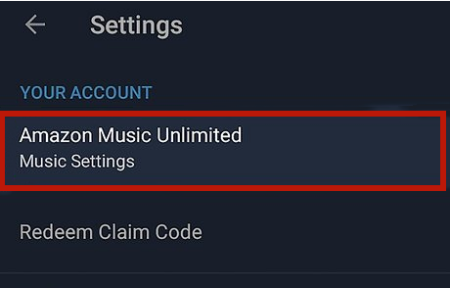
4. Here you can see the information about your subscription.
5. Click the Cancel Subscription option. Then, you need to confirm the cancellation by tapping Submit and confirm cancellation.
6. Once done, you will no longer be charged by Amazon Music. You can continue to enjoy your Unlimited features until the last date in the current billing cycle.
Part 4. How to Keep Your Amazon Music Songs before Canceling
Through the available methods above, you can easily cancel your subscription and will not be charged by Amazon Music anymore. However, once your subscription ends, all of your downloaded content will become inaccessible. If you want to keep your favorite songs, the best method is to download them as local music files ahead of time. To achieve this goal, you must remove the DRM protection, which limits you to only listening to Amazon Music songs on its app or website. The best helper you can get is the TunesMake Amazon Music Converter.
TunesMake Amazon Music Converter is a professional and potent music converter. It can help you download and convert Amazon Music songs, playlists, albums, and podcasts to diverse normal audio formats, ensuring that you can listen to your tracks on other platforms and devices after cancellation. In accordance with your personal demands, you can select formats such as MP3, M4A, M4B, WAV, FLAC, and AIFF. You can even decide on other audio settings to personalize your music experience. What counts most is that the TunesMake tool smartly keeps the original sound quality and ID3 tags so that you don’t need to worry about your offline music enjoyment.

Key Features of TunesMake Amazon Music Converter
- Download songs from Amazon Music Prime, Music Unlimited, and HD Music
- Convert Amazon Music songs to MP3, M4A, M4B, WAV, FLAC, and AIFF
- Handle the audio conversion of Amazon Music at a faster speed of 13×
- Ensure the output audio quality while retaining ID3 tags and metadata
Step 1
Select your favorite Amazon Music content
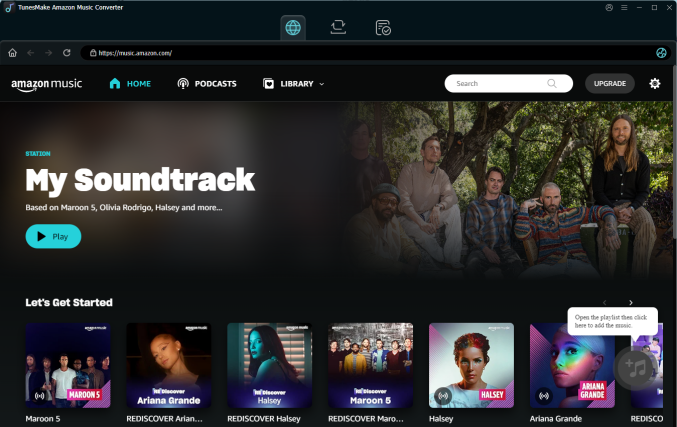
Click the Free Download button above to install TunesMake Amazon Music Converter on your computer. Please make sure you install the right version that is compatible with your computer’s operating system. Once done, launch it and you will see the official Amazon Music web player. After logging in, you need to find the playlist you want to save offline. Then, select it and click the lower Add icon > Add to List. Or, you can drag and drop one song to the Add icon directly. Both ways allow you to load the songs you choose to TunesMake.
Step 2
Customize the audio parameters for Amazon Music
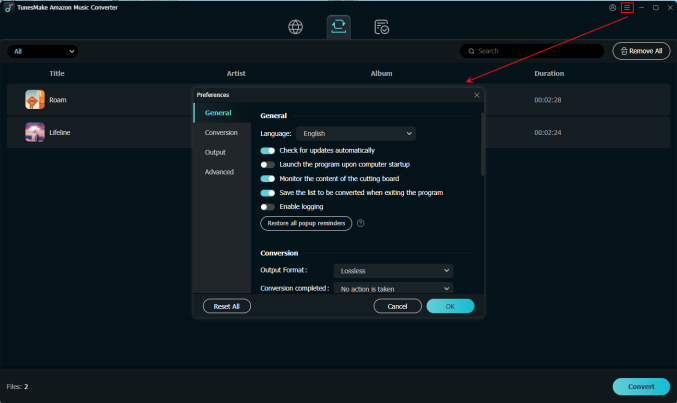
After loading all your favorite songs to TunesMake, you can set the audio settings depending on your needs. Just click the Menu icon at the top right corner > Preferences > Convert. In the new pop-up window, you can choose one output format and set other parameters, like bit rate, sample rate, and channel.
Step 3
Download and convert Amazon Music songs for saving offline
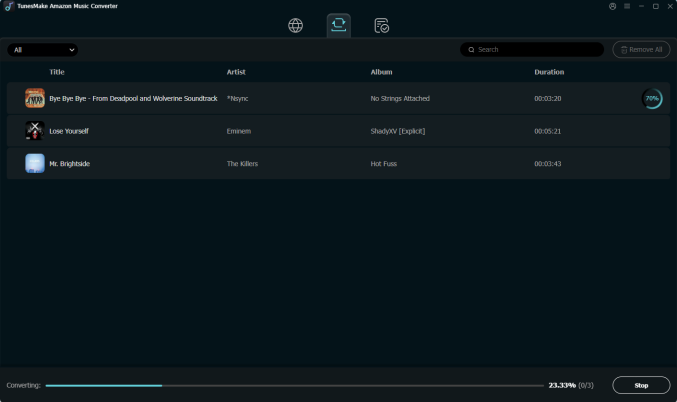
Now everything is prepared. You can click the Convert button at the bottom to begin downloading and converting the Amazon Music songs you like. Wait for a while, you can get all the DRM-free music files in normal formats. They will be listed in the Converted section. You can find their local files on your computer by clicking the file icon next to each song.
Part 5. Troubleshoot: Can't Cancel Amazon Music
It’s not difficult to cancel your Amazon Music subscription. But sometimes, users encounter issues when canceling their subscriptions. If you also find you can’t cancel your subscription, here are some common solutions to fix it.
1. Check your Amazon Music account.Before troubleshooting further, you need to ensure that your Amazon Music subscription is active and you are logged into the correct Amazon account.
2. Use the correct method for canceling. If you are unable to cancel Amazon Music, you need to make sure you are following the correct steps mentioned above.
3. Clear browser cache and cookies. Sometimes, web browsers store old data that may cause issues. Thus, you can try to clear the browser cache and cookies to fix the Amazon Music cancellation issue.
4. Update the Amazon Music app. An outdated Amazon Music app might prevent you from canceling Amazon Music. It’s better to make sure that your Amazon Music app is up-to-date.
5. Check for billing issues. If your cancellation attempt keeps failing, it could be due to an unresolved billing issue. When there are problems with your payment methods, Amazon may place restrictions on your account.
6. Contact Amazon Music support. If none of the above solutions work, you can try to contact Amazon’s customer service team and ask them to cancel your subscription manually. They can also assist you in resolving any technical issues.
Part 6. Bottom Line
Whether you are listening to Amazon Music on your mobile phone or computer, it’s easy to cancel Amazon Music subscription as long as you follow the detailed guidance above. However, it’s important to know that you will lose all your downloaded content once your subscription ends. If you want to keep your favorite songs forever, you can not miss TunesMake Amazon Music Converter. It allows you to convert and save your tracks in accessible formats, so you can enjoy your Amazon Music library long after your subscription ends.
Related Articles


- 1
- 2
- 3
- 4
- 5
- 6
- 7