
Tidal is one of the most commonly used music streaming services on all devices for its vast library, curated features, as well as its easy connectivity. When it comes to casting Tidal on speakers, DJ programs, or TVs, Tidal Connect, arguably the most important feature in the streaming world, gets all the credit. Using this feature, streaming your favorite music seamlessly from Tidal Cloud straight to a host of devices has never been easy. Now, let’s get closer to Tidal Connect. This post will explore everything you want to know about Tidal Connect and help you troubleshoot the Tidal Connect not working issue via effective solutions.
Part 1. What Is Tidal Connect?
Similar to Spotify Connect, Tidal Connect is a feature that allows users to stream music directly from the Tidal app to compatible audio devices without using third-party software. With this feature, you are no longer restricted to enjoying Tidal’s 100 million songs solely through your phone or desktop. You can easily switch seamlessly between different speakers and sound systems.
In addition, using Tidal Connect makes your phone or desktop a remote control that can control the playback of another device. You can even make calls or receive other audio without interrupting playback. In general, Tidal Connect provides a seamless and high-quality way for users to interact with their high-fidelity audio systems.
Part 2. Explore Tidal Connect: Everything You Need to Know
Tidal Connect enables direct streaming from the Tidal app to compatible audio devices, bypassing the limitations of traditional streaming methods. You now have established a foundational understanding of what Tidal Connect is. It’s time to delve deeper into the practical aspects of utilizing this feature.
Tidal Connect Requirements
To fully utilize Tidal Connect, the following key requirements must be met.
Note
-
An active Tidal subscription
-
The latest version of the Tidal app
-
An audio device that is compatible with Tidal Connect
-
A stable Internet connection
-
Your mobile device version is iOS 15/Android 7 or above
-
Your mobile device and your audio device are connected to the same network
Tidal Connect Quality
Tidal style itself as the audiophile’s music streaming service so it offers a connection quality that surpasses traditional wireless streaming methods. Traditional wireless connections like Bluetooth and AirPlay often compromise audio quality, resulting in a noticeable loss of detail and dynamic range. In contrast, Tidal Connect establishes a direct and uncompressed pathway from Tidal’s servers to your audio device. This direct stream ensures that the audio data remains intact, faithfully reproducing the lossless audio quality.
Advantages of Tidal Connect
In a market full of wireless connection options, the question naturally arises: why choose Tidal Connect? Beyond simply connecting devices, Tidal Connect distinguishes itself through its commitment to high-fidelity user experience. This section will talk about the main advantages of Tidal Connect.
1. Lossless Audio Quality
As we mentioned above, Tidal Connect has the ability to stream lossless audio. It is one of the biggest advantages. Whether you want to enjoy HiFi or MQA audio, you can utilize Tidal Connect to ensure your music experience is preserved with every detail.
2. Multi-device Control
With Tidal Connect, you can control the music playback from the Tidal app on your device. It is smoother and better than any third-party one. It provides effortless control across multiple devices. Whether transitioning from your smartphone to a speaker or another Tidal Connect-enabled device, the whole process is smooth and hassle-free.
3. Uninterrupted Listening Experience
Normal wireless connections can be disrupted by notifications, calls, or other background apps. However, Tidal Connect keeps the music flowing without interruptions. Since the playback happens independently on the connected device, you can browse other apps without affecting the music experience.
4. Wide Compatibility with Audio Devices
Tidal Connect supports multiple high-end audio brands and devices, including Naim, Cambridge Audio, Sonos, KEF, Bluesound, and more. This makes it an ideal choice for audiophiles who have a premium sound system and want to maximize their listening experience. To check all the devices that are compatible with Tidal Connect, you can check this page.
Part 3. How to Use Tidal Connect [Subscribers Only]
Tidal Connect is easy to use. So prepare your compatible Tidal Connect device and make sure it and your Tidal-ready device are connected to the same WiFi. After that, perform the following steps.
Note
The Tidal Connect feature is only for Tidal premium users and is not available on the web player.
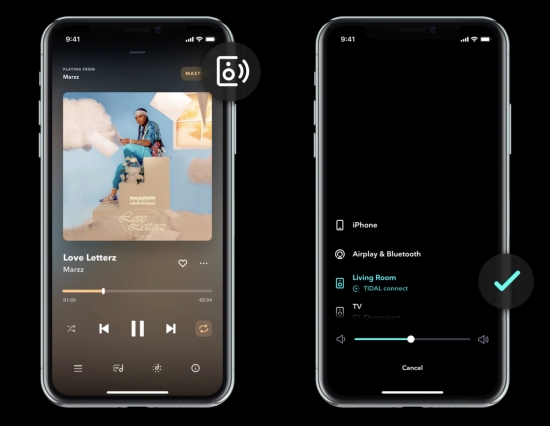
Step 1. Launch the Tidal app on your phone or computer.
Step 2. Pick any content to start playing to access the Now Playing screen.
Step 3. Hit on the device icon which is located at the upper-right corner of the Now Playing screen on mobile or at the bottom corner of the Now Playing bar on desktop.
Step 4. From the available devices list, choose one to set up Tidal Connect and cast Tidal music.
If you are subscribing to the Tidal premium plan, you can even stream Tidal MQA, Dolby Atmos, and 360 Reality Audio on Tidal Connect devices. Those optimal performances are unique for Tidal Connect and cannot be felt on devices connected to Bluetooth or AirPlay.
Part 4. How to Resolve Tidal Connect Not Working
For me, Tidal Connect has stopped working in the past few days. I’ve got two Tidal Connect enabled devices, as Raspberry Pi and a Bluesound Powernode. I can see them in the Tidal app, but when I select them, playback pauses… and nothing else happens.”
When streaming Tidal through Tidal Connect, quite a few users found an aggravating experience. Have you been struggling with the above situation? So what to do when Tidal Connect won’t work? In this part, we are going to answer it and share several troubleshooting tips.
Fix 1. Reconnect the Network
When you receive an error message saying “Tidal no connection tap to refresh”, check if the WiFi is solid and confirm the two devices are connected to the same wireless connection. When the connection is not stable, it is impossible to access online content on Tidal or use the Tidal Connect feature. Additionally, you can turn off WiFi on both devices and then reconnect them to the same wireless connection.
Fix 2. Relaunch the Tidal App
The Tidal Connect not working issue might be the Tidal app itself. Bugs occur from time to time and then lead to malfunction. Hence, forcing close the Tidal app and then reopening it is helpful.
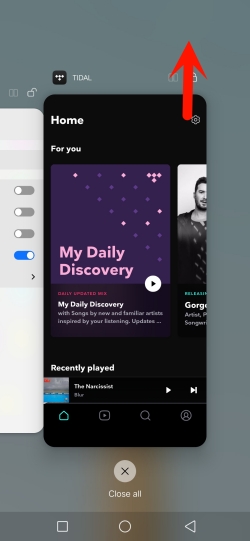
On Android or iOS devices, swipe up from the bottom of the screen to enter the multitask interface, and locate the Tidal app. Hold and swipe up on the Tidal’s preview to close it.
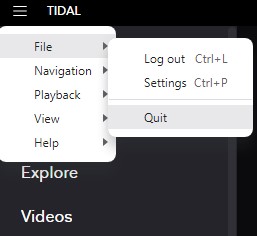
On Windows or Mac, just head to the 3-line icon in the upper left corner and select File > Quit.
Fix 3. Sign Out and then Back In
This way sounds to no avail. But actually, some users gave feedback that they solved Tidal Connect not working by signing out of their current accounts.
On the Tidal mobile app, go to Tidal Settings from the upper right corner. Scroll down to the bottom and you will see Log out.
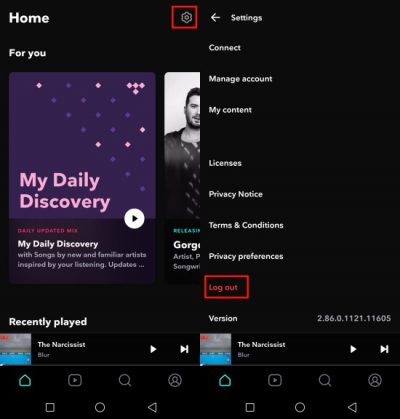
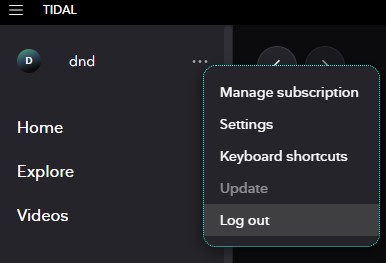
On the Tidal desktop app, locate the three dots next to your Profile and the Log Out option will display.
After logging out, Tidal will prompt you to sign in. Just enter your email and password to sign into your account again.
Fix 4. Clear Tidal Caches
Apart from the bugs in the Tidal app, the issue could be that your cache is full. Clearing caches Tidal produced regularly can ensure Tidal works well.
On Android, open the Settings app and go to Storage > Tidal > Clear Cache.
On iOS, navigate to Settings > General > iPhone Storage > Tidal > Offload App.
On Windows, launch Tidal and click the menu bar featuring three lines. Select Help > Troubleshooting > Clear Cache.
On Mac, fire up Tidal and click the menu icon to enter the Preferences option. You will find Cache and then click Clear Cache.
Fix 5. Reinstall the Tidal App
If restarting the Tidal app and clearing caches don’t work to solve Tidal Connect not working. The ultimate way is to get rid of the Tidal app. Uninstalling is seen as the most used and effective way to fix a series of issues.
On Android or iOS devices, tap and long press the Tidal icon on the Home page. Then from the dropdown menu, select Uninstall or Delete App. After that, go to Google Play Store or App Store to get the latest version of Tidal.
On Windows, click Start > Settings > Apps > Installed Apps. Choose the Tidal app and click the Uninstall button. Subsequently, go to the Tidal download page to get the Tidal desktop app.
On Mac, open Finder and select Application from the left panel. Locate Tidal and drag it to Trash. Then go to App Store to install Tidal again.
Fix 6. Use A USB Drive to Play Tidal on Other Devices
Wish the above ways feasible to hook you up. If all fails, then the Tidal app and Tidal Connect might be out of control. This time, try to play Tidal on other devices without Tidal Connect. To do so, all you need is TunesMake Tidal Music Converter. Use it to help you get Tidal files and then transfer them to a USB drive. After that, insert this USB drive into your devices and you are free to play Tidal without issues.
Part 5. Bonus: Enjoy Tidal on All Devices Without Tidal Connect
Through the above solutions, you are able to fix all the issues when using Tidal Connect. However, sometimes, all the above ways can not solve your issue. Don’t worry. In such a case, there is still an alternative method that can help you. That is to remove the DRM protection and download Tidal songs as local files so that you can import them to other devices for offline playback without Tidal Connect. How to reach it? TunesMake Tidal Music Converter is the best helper!
TunesMake Tidal Music Converter is a professional and powerful music downloader designed for all Tidal users. With its help, you are free to connect Tidal to any device you like after downloading Tidal songs, playlists, albums, podcasts, and more. Depending on your demands, you can decide on the audio formats such as MP3, M4A, M4B, WAV, FLAC, and AIFF. More importantly, to give you the best experience like Tidal does, TunesMake retains the original quality whether it is MQA or HiFi, and allows you to change the sample rate and bit rate. So you don’t need to worry about the sound quality when playing Tidal on other devices.

Key Features of TunesMake Tidal Music Converter
- Download any Tidal content, including songs, albums, playlists, and artists
- Support exporting Tidal music to MP3, AAC, FLAC, WAV, M4A, and M4B
- Preserve a whole set of ID3 tag information in the downloaded Tidal songs
- Handle the conversion of Tidal music up to 22× faster speed and in batch
Step 1
Add Songs from Tidal to TunesMake
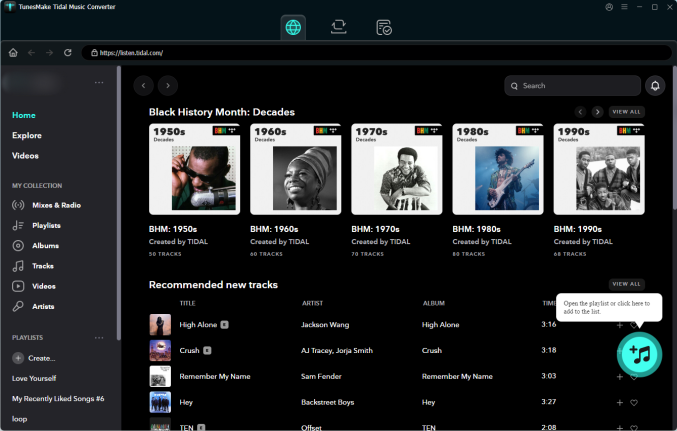
Open TunesMake Tidal Music Converter after installation and you will be navigated to the Tidal web player in its interface. Here you need to sign in to your account and find your desired track. Simply drag and drop it to the add icon at the lower right bottom. You can also select your preferred playlist or album and click the add icon to download them in batches.
Step 2
Adjust the Output Format
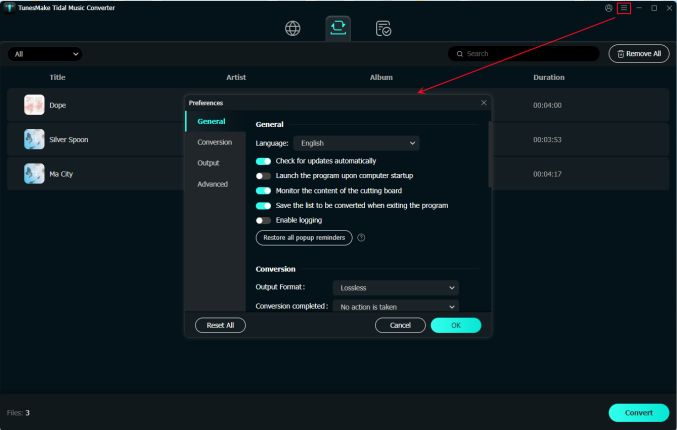
TunesMake boasts customizable options for every user. Click the menu icon in the upper right corner and select the Preferences option. On the new pop-up window, switch to the Convert section. Now, you can change the output format, bit rate, sample rate, and channel as you want. To play Tidal on any device, just leave the MP3 format as the default option as MP3 is the most common and compatible format. If you make other adjustments, click OK before exiting the window.
Step 3
Download Tidal Songs Locally
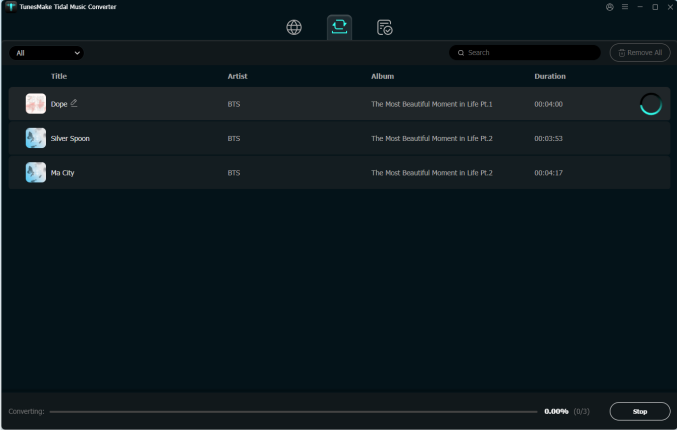
Just click the Convert button at the bottom right corner, and TunesMake will automatically download and convert Tidal songs to MP3 at a 5x faster speed. After conversion, all the Tidal songs will be saved to your computer. You can navigate to the Converted list to browse all your converted songs or or click the file icon to locate them in the local folder.
Step 4
Move Converted Tidal Songs to USB Drive
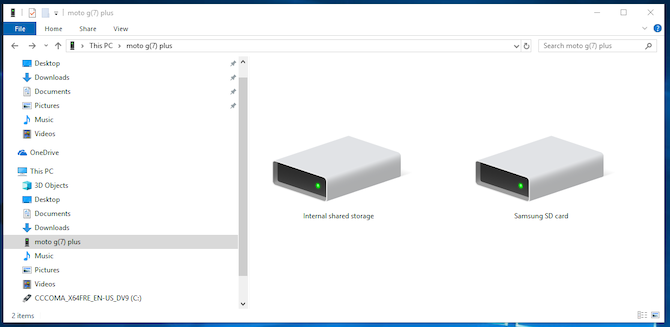
Done! You’ve got Tidal physical files. You are able to play them with the built-in player on your computer. To play Tidal on other devices without Tidal Connect, a USB drive is needed. Simply insert your USB drive into the USB port of your computer and create a new folder in the USB drive for storing Tidal music files. Locate the folder where you save the converted Tidal music files and move them to the new folder on your USB drive.
Part 6. Conclusion
By the time you read this, you should have known what is and how to use Tidal Connect. Undoubtedly, Tidal Coonect enables you to stream Tidal on various devices with ease. However, the Tidal Connect not working issue can ruin your listening experience. So the above solutions you can have a try. Among them, TunesMake Tidal Music Converter is a perfect fix that not only gets rid of Tidal issues but also plays Tidal on multiple devices at the same time.
Related Articles

A senior editor from TunesMake, dedicated to sharing professional tutorials and solutions of software, movies, and music.
- 1
- 2
- 3
- 4
- 5
- 6
- 7